The world of curly hair can be incredibly confusing and overwhelming! Many people give up before they start simply because the information they’re reading just doesn’t make sense.
If you’re new to curly hair methods or simply aren’t sure what all those words refer to, we’ve got you!
Here’s a list of some common terms used in the curly hair world and what they mean. Plus, you might find some useful tips and techniques to add to your routine!
-Emma, Curly Cuts Curl Trainer
Washing Curly Hair
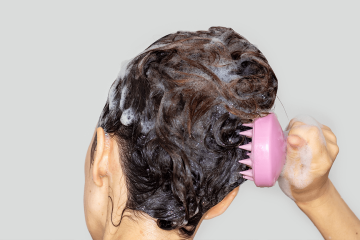
● No-poo: a cleanser that does not foam up. It doesn’t rely on harsh detergents to clean the hair. It is much more gentle than shampoo. They require more work due to the lack of foam- a scalp brush can help to make it more effective, or massaging for about a minute.
● Low-poo: a shampoo that foams a bit, and doesn’t use harsh ingredients to clean. They are good for clarifying washes that can be done every few weeks to deal with any buildup. Also good for very fine hair that gets weighed down easily and doesn’t respond well to no-poo.
● Shampoo: normal amount of foam and harsh cleaning agents.
● Co-wash: washing the hair and scalp with a conditioner that has cleansing ingredients. Usually done between no-poo washes to refresh the hair, or instead of using any kind of no-poo/low-poo/shampoo.
● Light conditioners: lightweight conditioners that generally don’t contain heavy oils and butters. Suitable for wavy hair and fine curly hair or very healthy hair.
● Heavy/rich conditioners: sometimes contain heavy butters and oils, or just a stronger version of the light. Can way down fine and wavy hair, more suited for thick, damaged and coily hair.
● Deep treatment/conditioner: a very heavy conditioner that adds a lot of moisture and/or protein to the hair. Should be done every 4-6 weeks, left in for 10-20 minutes (as per directions on product) and fully washed out. Should always be done after a clarifying wash.
Techniques used when washing curls
● Squish to condish (S2C): a method of conditioning. This can be done by cupping some water in the hand and then squeezing it into a small section of hair that has conditioner in it. Repeat a couple of times on each section. Should make a squelchy noise!
● Bowl method: similar to S2C, using a large bowl with warm water. Once conditioner is distributed through the hair, leaning over the bowl and allowing the hair to fill it. Squishing water into the hair many times, with the conditioner mixing with the water in the bowl and then rinsing it out in the shower.
● Roping: applying the conditioner in sections with your hand in a circle around the section, using both hands as if pulling a piece of rope, adding water to the conditioner.
● Slip: the feeling of the hair once it is well hydrated. It should feel like wet seaweed. Once slip is achieved, you can wash out the conditioner. The above methods will help achieve slip.
● Finger combing: using fingers to apply conditioner to the hair and gently remove knots.
● Wet brushing/combing: using a wide tooth comb or wet brush to disperse the conditioner evenly through the hair. Finger combing first is recommended so that any big knots are removed.

Styling Curly Hair
● Raking: a method of dispersing styling products through the hair. Similar to finger combing, using the fingers like a rake to ensure even distribution. Just raking the product through will elongate curls and reduce shrinkage.
● Scrunching: using the hands to scrunch in product. Best to do this once the product is already dispersed through the hair otherwise some sections may be missed. Scrunching will encourage tighter curls and shrinkage.
● Prayer hands: mostly used to apply gel, pressing the palms of the hands together around small sections of hair. This will keep the shape of the curls that were achieved with the above methods. Ensures even distribution of gel without disrupting curl pattern.
● Cast: when the hair is hardened from the gel or other product with hold. Casts can be light or strong. They help keep the hair hydrated while it dries, but will add to the drying time.
● Scrunch out the crunch: once the hair is completely dry, the crunchy cast is scrunched out. Should reveal soft bouncy curls. If the hair feels sticky or tacky, it is too early to scrunch and the hair isn’t dry enough yet.
● Denman brush: a special styling brush that can encourage ringlets and bigger clumps of curls. Used after styling products are applied.
● Finger curling: taking individual curls and twirling them around the finger, in the direction they are already curling. Very time consuming but can be used on any unruly or wonky curls, doesn’t have to be done on the whole head.

Drying Curly Hair
● Plopping: using a cotton t-shirt or microfibre towel to position the hair at the top of the head to start the drying process (but not fully dry) without any twisting or pulling. Can be left on for several hours, but may pull out too much product if left for too long. Can also make curls look a bit wonky. Ideal amount of time is 5-30 minutes in my experience.
● Micro-plopping: using a cotton t-shirt or microfibre towel over the hand to gently squeeze excess moisture out of the hair before drying.
● Wet-plopping: using a shower cap to hold hair on top of the head once all styling products are applied. Encourages hair hydration and defined curls.
● Diffusing: using a diffuser attachment to dry the hair. Will speed up drying time, encourage volume, but may increase frizz. Also may prevent a cast from forming (which is fine, it just breaks the cast as the hair dries). Always diffuse from the scalp to the ends of the hair.
● Hover diffusing: holding the diffuser a few centimetres from the hair to dry without disrupting the curl and minimising frizz.
● Cupping: with the head (usually) upside down, cupping small sections of hair in the diffuser and holding it close to the head. Will dry the hair quicker, encourage more curls as well as volume, but disrupts the curl pattern somewhat and may create frizz.
● Air-drying: allowing the hair to dry naturally. Takes the longest time, but will create the strongest cast and the least frizz. It is important to not touch the hair while it dries. To encourage more volume, the part can be flipped in the opposite direction to its usual position.
● Root clipping: using 2 pronged metal clips at the roots of the hair around the crown or along the part. Creates lift from the root to prevent the hair being flat on the top.
Other terms
● Pineappling: loosely tying the hair in a ponytail at the top front section of the head for sleeping to protect hair at night. Can stretch out the curl and doesn’t prevent frizz, however.
● Buffs: long cotton tubes that can be used to protect the hair at night and prevent it from moving. A very effective way to prevent frizz, knots and to maintain the curl overnight. Hair should be piled on top of the head like when plopping.to prevent one side from getting flattened by sleeping on it.
● Bonnets/caps: made of silk/satin and used on the hair to protect it at night. Similar to buffs and also very effective, though some may struggle with getting the correct size.
● Refresh: adjusting the hair on the days following wash day. There are various methods of refreshing.
● Wet refresh: spraying the hair down with water (may be mixed with a small amount of curl cream/conditioner) in order to reactivate the styling products already in the hair. May create a new cast. Hair doesn’t need to be dripping wet, just damp. Hands can then be used to smooth down any frizz or to scrunch the ends of the hair.
● Dry refresh: adding in more product to dry hair. Usually a light product that won’t weigh down the hair, or to particular parts of the hair that are misbehaving. Should be done later in the week after the wash day when there is less product left over in the hair.
● Cocktailing: using multiple styling products, ie mousse-gel-mousse.
Click here to read more easy curly hair blogs from Natural Eclipse